Stand Assembly Instructions
Our stands are designed for straightforward assembly using secure, accurately fitted components. The guides below explain how to fit our snap-fit support braces, attach Moog tier stand frames using the instrument’s original end-cheek screws, check that each part is correctly orientated, and avoid the most common assembly mistakes.
Please select the relevant section below before beginning. If anything does not align as shown, stop and check the component orientation rather than forcing it into place.
Jump to:
Snap-Fit Brace Assembly Instructions
How do I fit the snap-fit support braces?
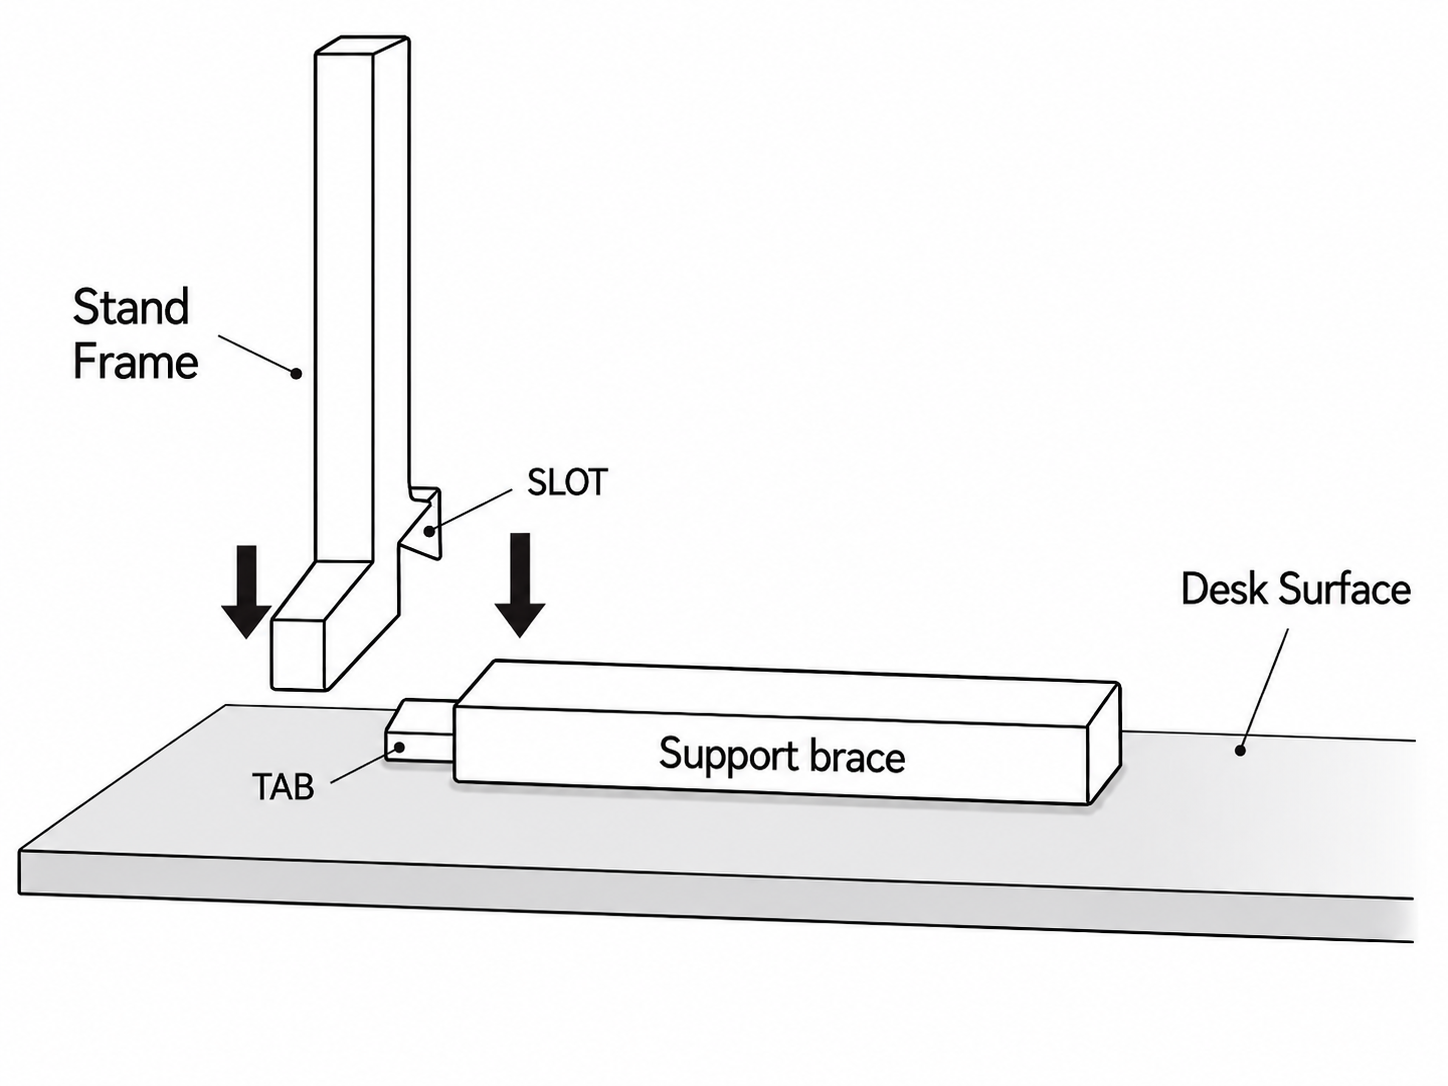
Our braces are designed to click firmly into the matching slots in the stand frames. The important part is to press the frame down onto the brace, rather than trying to push the brace sideways into the frame.
Place the support brace flat on a desk, worktop or other hard surface.
Position the stand frame above it.
Align the slot in the frame directly over the tab on the end of the brace.
Push the frame firmly and vertically downwards until the joint clicks securely into place.
Repeat for the remaining brace connections.
The fit is intentionally firm. Once clicked together, the braces help keep the stand rigid and securely aligned.
Why must the brace be placed on a hard surface?
The hard surface supports the brace and its locating tab from underneath while the frame is pressed into place.
When assembled this way, the tab cannot bend or snap because the force is directed straight down into the supported joint.
What should I avoid doing?
Do not try to push, twist or lever the brace sideways into the frame slot.
Trying to force an unsupported brace tab sideways can bend it and may cause it to snap. Always leave the brace resting flat and press the frame down onto it instead.
The joint feels very tight. Is that normal?
Yes. The braces use a deliberately firm snap fit so that the finished stand remains rigid and does not wobble or work loose during normal use.
Check that the frame slot is positioned directly over the brace tab, then apply firm, even downward pressure. It should click positively into place.
Can the brace tab snap during assembly?
Not when it is assembled correctly.
With the brace lying flat on a hard surface, the tab is fully supported and cannot flex far enough to snap. Breakages occur when the brace is incorrectly forced or levered sideways into the frame.
Are the braces only used to space the stand frames apart?
No. Our current braces are structural parts of the stand. They do more than simply hold the two sides at the correct distance: they also help brace the assembled frame and keep it rigid.
Have the braces been improved?
Yes. Earlier versions were treated more as spacing pieces and could be damaged more easily if fitted incorrectly. Our current snap-fit braces are made stronger and are designed to contribute directly to the strength and rigidity of the assembled stand.
Brace breakages are now extremely uncommon.
Are the fittings checked before dispatch?
We endeavour to inspect and test the stand components while packing each order. Illustrated assembly instructions are also included with our stands, but please contact us before forcing anything if a joint does not appear to align correctly.
Important assembly reminder
Place the brace flat on a hard surface, align the frame slot above the tab and press the frame straight down until it clicks. Never force the brace sideways into the frame.
Moog Tier stand assembly Instructions
Our Moog tier stands attach using the existing screws from the wooden end cheeks of your Moog units. No additional screws are required.
Before you begin
Check the orientation of both stand frames before fitting them.
The reinforced buttress edges, containing the notched support-brace slots, must face outwards, away from the Moog units.
If the frames are fitted to the wrong sides:
the buttresses will foul against the Moogs;
the frames will not sit flush;
the spacing between the brace slots will be incorrect.
Step 1: Identify the left and right stand frames
Position each frame beside the corresponding end of the Moog.
Make sure the reinforced buttress edge and brace slots face outwards. The smooth inner face of each frame should sit flush against the side of the instrument.
Do not tighten or attach anything until both frames are correctly oriented.
Step 2: Remove the upper end-cheek screws
Remove the top two screws from each wooden end cheek.
Keep these screws safe. They will be reused to secure the stand frames to the Moog.
Step 3: Choose whether to retain the wooden end cheeks
The stand can be fitted with the wooden end cheeks left in place, so removing them completely is not required.
However, we personally recommend removing the wooden cheeks where preferred. This allows more of the original screw length to thread back into the Moog, providing greater purchase and security.
This is largely a matter of personal preference and appearance.
Step 4: Leave the metal dust-cap plates fitted
Behind each wooden end cheek is a metal dust-cap plate of the same general shape.
We recommend leaving these plates fitted. They help prevent dust, fingers and other objects from accidentally entering the rear of the Moog.
Step 5: Position the first stand frame
Place the correctly oriented frame against the side of the Moog.
Align the two corresponding holes in the frame with the screw holes from which the original end-cheek screws were removed.
The frame should sit flat and flush against the instrument. If the buttress presses against the Moog or prevents a flush fit, the frame is on the wrong side.
Step 6: Refit the original screws
Insert the original Moog screws through the holes in the stand frame, then thread them back into their original holes in the Moog.
Start both screws loosely before tightening either one fully. This allows the frame to settle into the correct position without pulling it out of alignment.
Tighten until the frame is firmly secured, but do not overtighten.
Step 7: Fit the opposite frame
Repeat the same process on the other side:
Confirm that the buttress faces outwards.
Align the stand-frame holes with the original screw holes.
Refit the original screws through the frame.
Tighten the frame securely without overtightening.
Step 8: Fit the support braces
Once both side frames are securely attached, install the support braces using the snap-fit brace assembly instructions.
Place each brace flat on a hard surface, align the corresponding frame slot directly over the brace tab, then press the frame firmly straight down until it clicks securely into place.
Do not force or lever the brace sideways into the frame slot.
Final check
Before placing the stand into use, confirm that:
both reinforced buttress edges face outwards;
both frames sit flush against the Moog units;
all original screws are securely fitted;
the metal dust-cap plates remain in place;
every support brace has clicked fully into its matching slot;
the completed stand feels rigid and correctly aligned.
Important: If a frame will not sit flush against the Moog, do not force it. The left and right frames have most likely been fitted to the wrong ends.

Assembly Troubleshooting
If a component does not align or sit flush, do not force it. Check that the left and right frames are correctly positioned and that all reinforced buttress edges and brace slots face outwards. For further help, please contact us with a photograph of the stand and components.